
A fan is a blunt instrument: it blows at one speed, in one direction, whether you are next to it or across the room. This measurements and instrumentation project asked what it takes to make one aim - adjusting speed and rotation from real measurements of where people actually are, plus ambient temperature and humidity, so airflow follows the user instead of the user following the fan.
The module brief set the constraints: build a smart system from actuators and sensors including one custom sensor, integrate everything through LabVIEW and NI-DAQmx, and regulate power through a variable DC supply controlled with Rigol Ultra Sigma. As project lead, I built the custom sensor - a webcam-plus-vision pipeline that turns face detection into distance and angle measurements driving the fan's speed and servo rotation.
The custom sensor: a camera that measures distance
The interesting design problem was the custom sensor requirement. A camera is not a distance sensor - until you calibrate it into one. The system uses Mediapipe for face detection and OpenCV to process the video feed on a Raspberry Pi:
- Face Detection: Faces are detected in real time, with bounding boxes drawn around each.
- Distance Measurement: The bounding box area is converted to an estimated distance - closer faces occupy more pixels - with the conversion grounded in a measured calibration curve rather than guesswork.
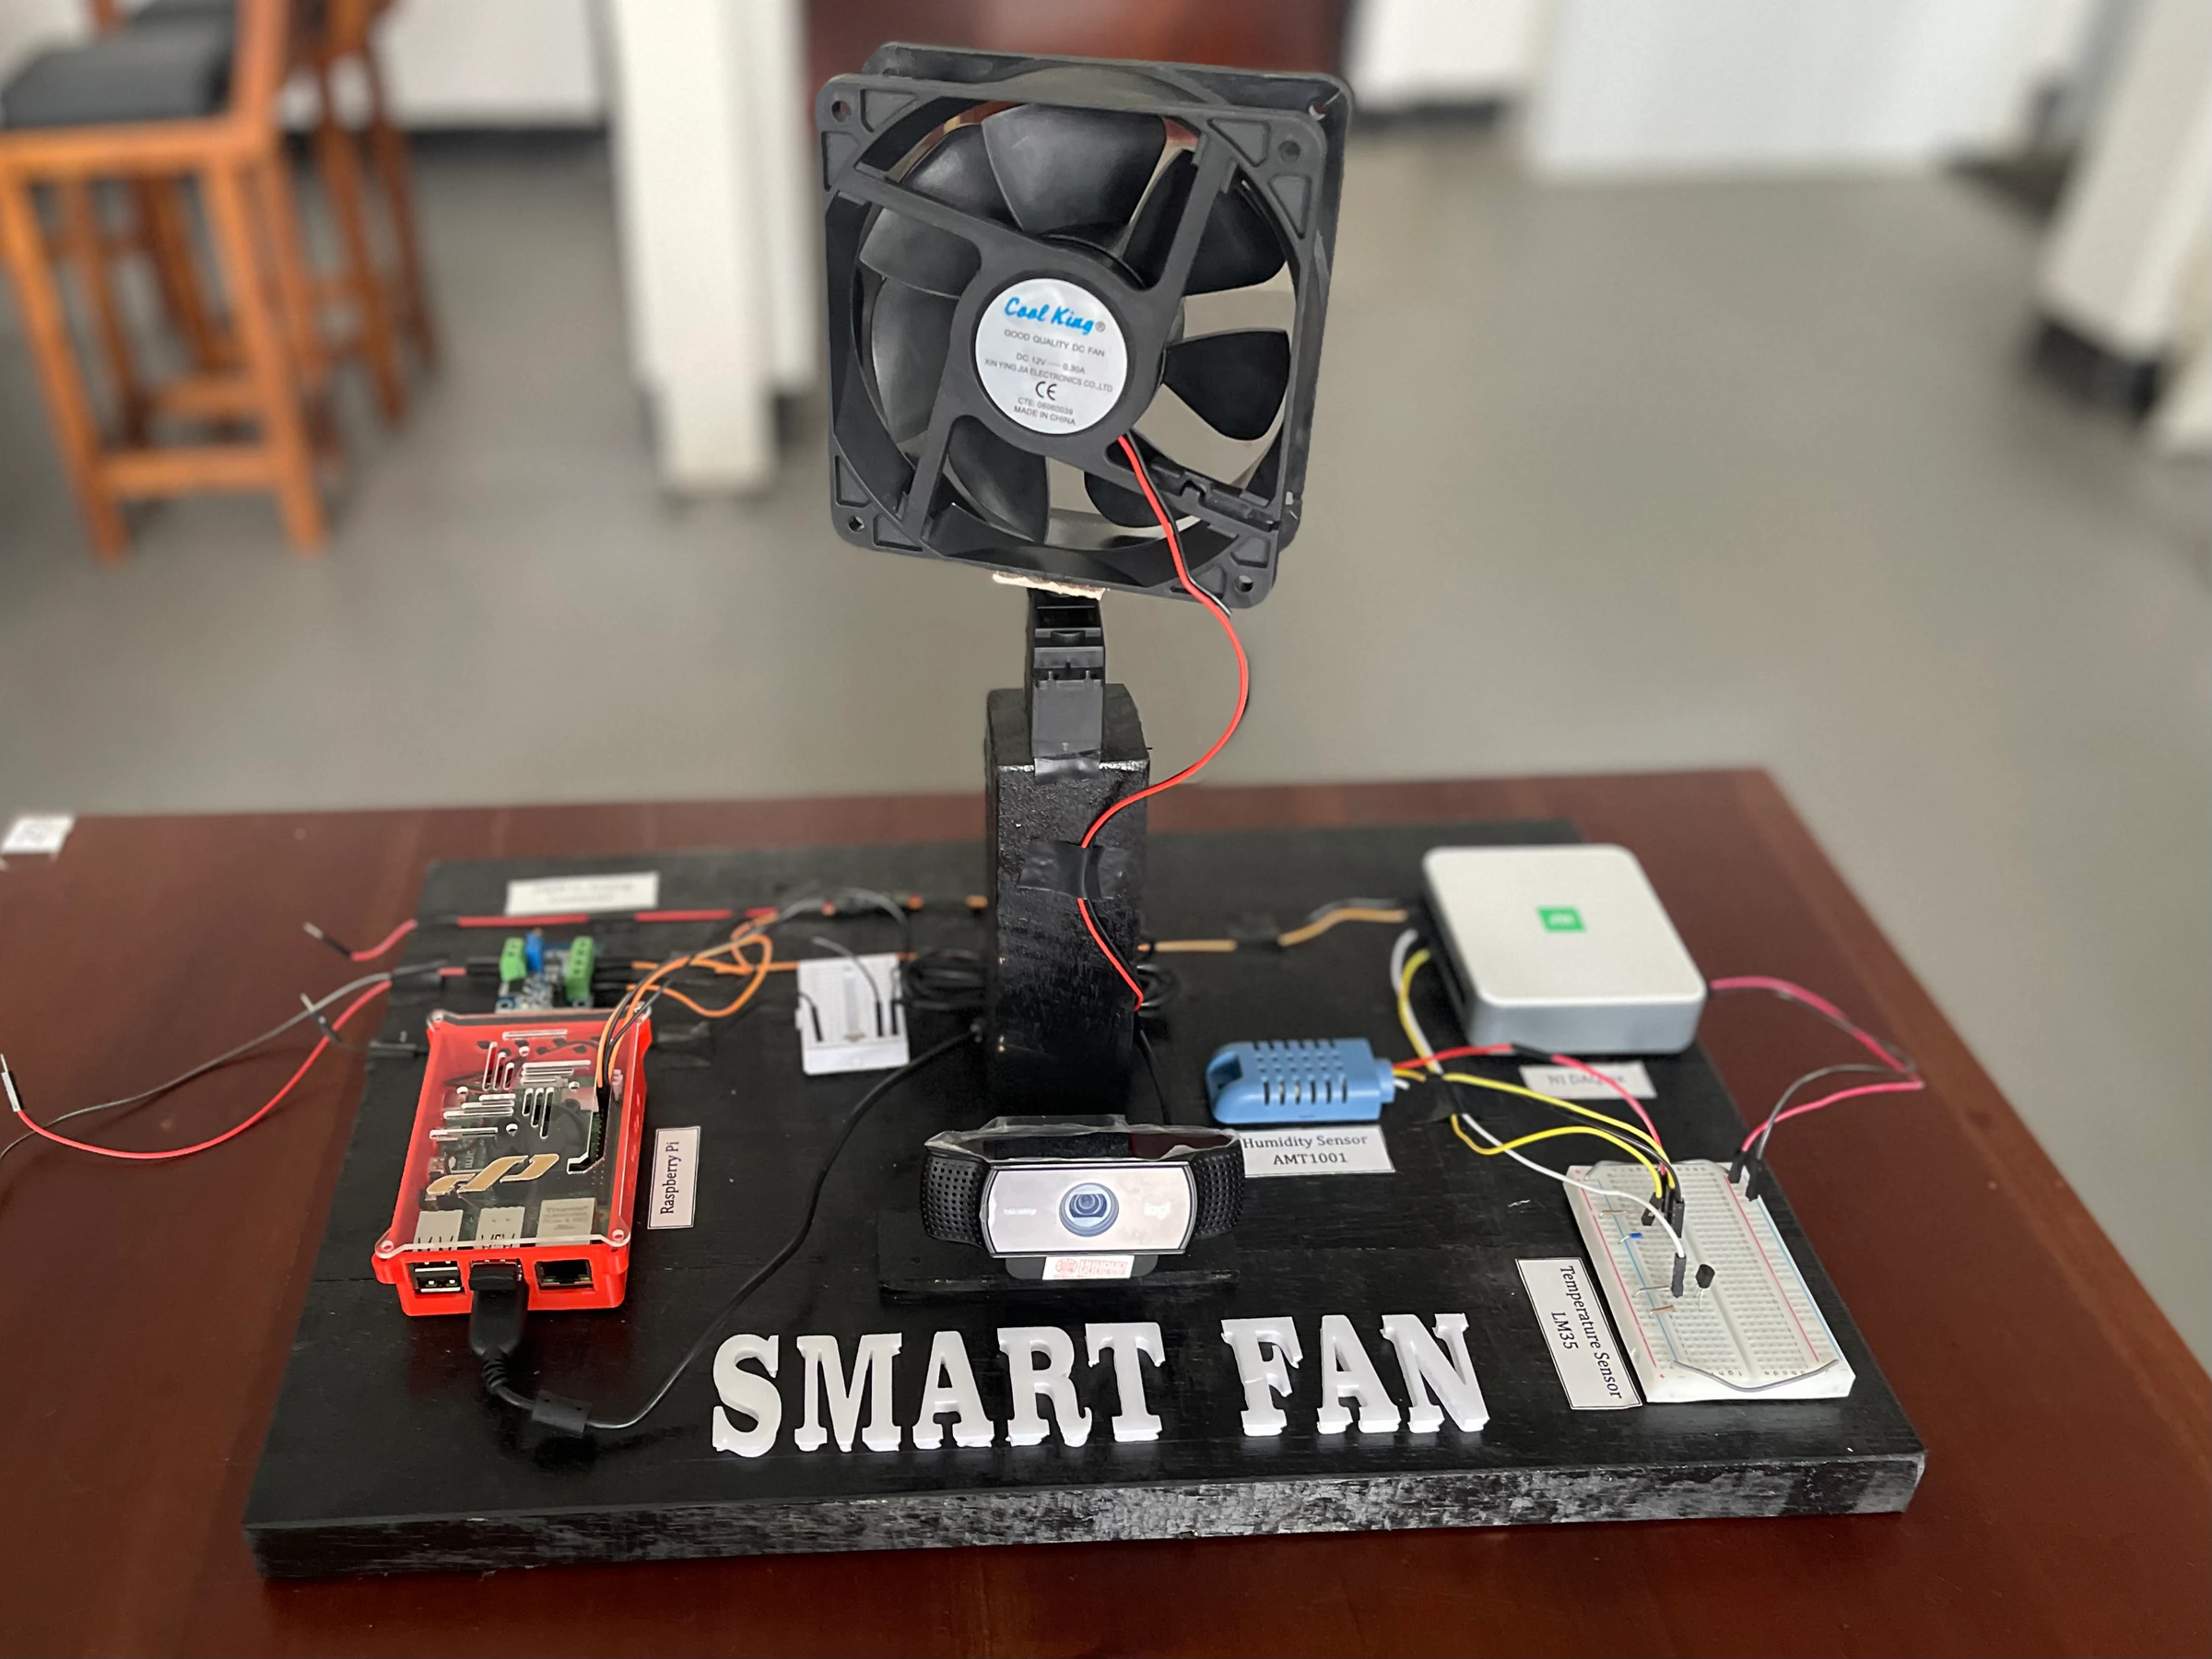
The control logic handles the awkward realities: one person versus several, and nobody at all. Here is the core logic in brief:
face_centers = obj_data(frame)
  # Get face positions
  face_centers = obj_data(frame)

  if face_centers:
      if only one face detected:
          face_x = x-coordinate of face
          angle = map face_x to servo angle [-80, 80]

          farthest_face = face with smallest depth
          distance_m = pixels_to_meters(farthest_face.depth)

          # Set fan speed based on distance
          if distance_m < 1:      set_pwm_distance(3)
          elif distance_m < 2:    set_pwm_distance(15)
          else:                   set_pwm_distance(26)

          display distance text on frame

          # Set servo angle range
          if angle < 30:      setAngle(30)
          elif angle < 60:    setAngle(60)
          else:               setAngle(80)

      else:
          # Multiple faces: draw lines between each pair
          for each pair (i, j) in face_centers:
              draw line between face i and face j

          leftmost  = face with min x
          rightmost = face with max x
          horizontal_distance = distance(leftmost, rightmost)

          farthest_face = face with smallest depth
          distance_m = pixels_to_meters(farthest_face.depth)

          # Set fan speed based on distance
          if distance_m < 1:      set_pwm_distance(3)
          elif distance_m < 2:    set_pwm_distance(15)
          else:                   set_pwm_distance(26)

          display distance and left-right distance on frame

          if horizontal_distance > 0:
              face_range = rightmost.x - leftmost.x
              angle = map face_range to servo angle

              if angle < 30:      setAngle(30)
              elif angle < 60:    setAngle(60)
              else:               setAngle(80)

              display angle text on frame
  else:
      # No faces detected
      print "No face detected"
      stop fan and center servo
Note the decisions embedded there: speed follows the farthest face so nobody gets left out of the airflow; multiple faces widen the sweep angle to cover the whole group; and no faces means the fan stops - presence detection doubles as the energy saver.
Servo Motor Control
Based on the detected face positions, the system adjusts a servo motor via RPi.GPIO:
- Angle Calculation: The horizontal position of the faces determines the target angle.
- PWM Control: The Raspberry Pi drives the servo with 50Hz PWM, aligning it with the detected faces.
System Workflow
The block diagram below shows how the components interact:
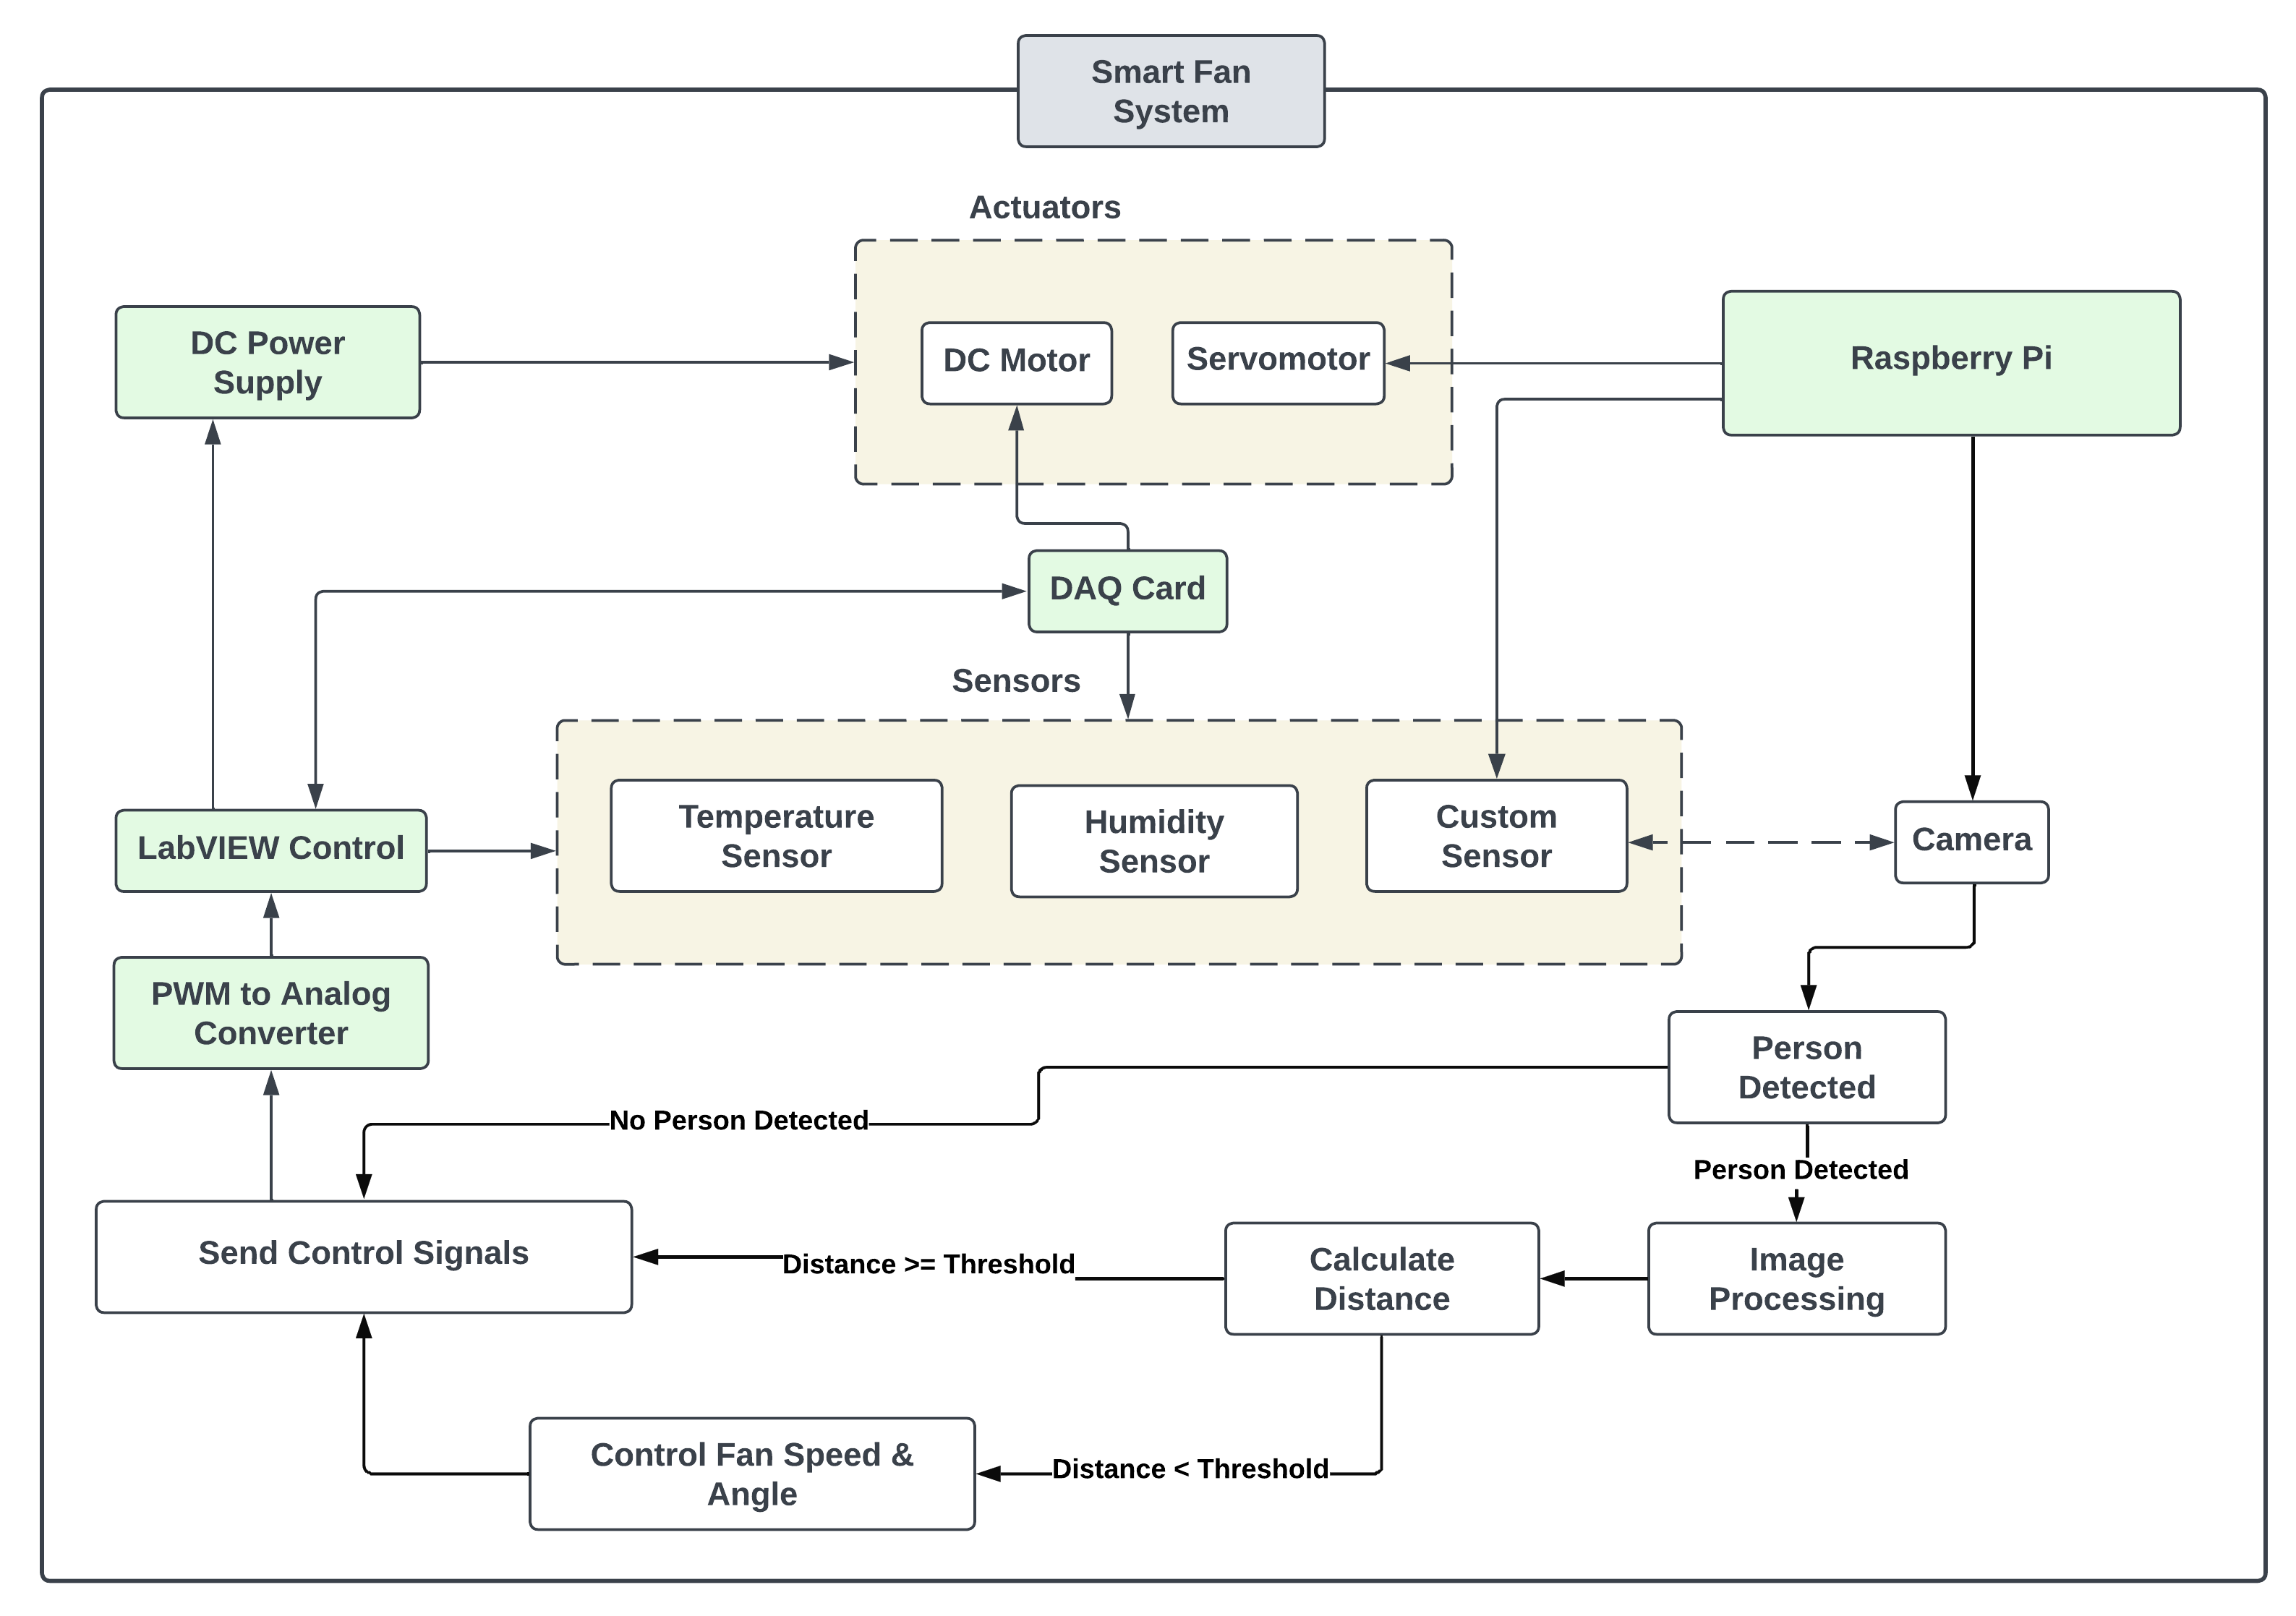
Overall workflow of the Smart Fan system.
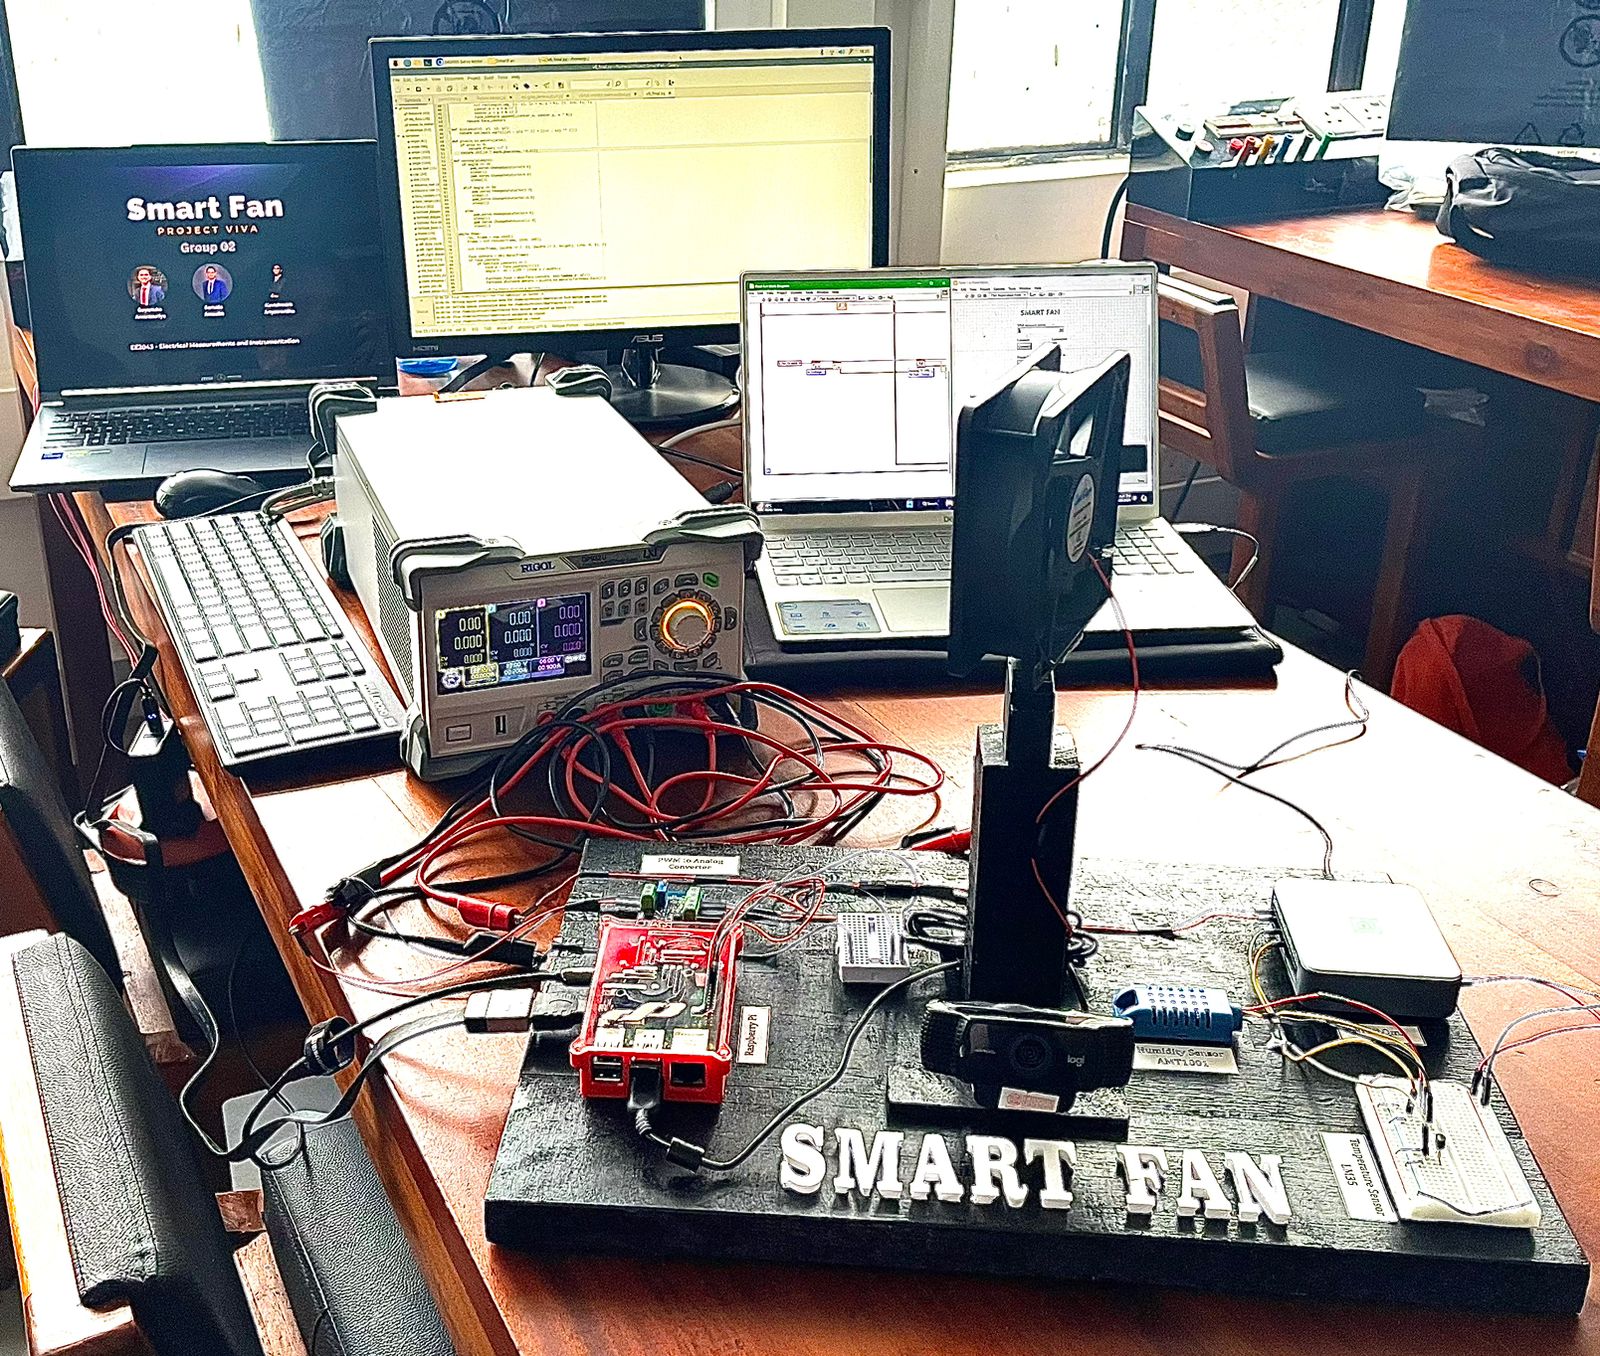
Overall setup of the Smart Fan system.
- Raspberry Pi: Processes video input for face detection, calculates distance, and controls the fan's rotation angle.
- Webcam: Captures real-time video to detect user presence and measure distance.
- LabVIEW: Integrates sensor data and controls the system, managing fan speed and rotation.
- Servo Motor MG-995: Adjusts the fan's direction based on the user's position.
- DC Fan: Speed modulated by PWM signals, with power supply controlled through LabVIEW.
- NI DAQ mx: Acquires data from sensors and actuators, feeding real-time feedback to the LabVIEW interface.
- Rigol Variable DC Power Supply: Modifies fan speed based on control signals from LabVIEW.
- LM35 Temperature Sensor: Measures ambient temperature.
- AMT1001 Humidity Sensor: Monitors humidity levels.
Calibration: what makes it instrumentation
A measurements project lives or dies on calibration. Every sensing channel got its own measured curve - the face-size-to-distance mapping, temperature response, and humidity response - so the fan reacts to physical quantities, not raw sensor values.
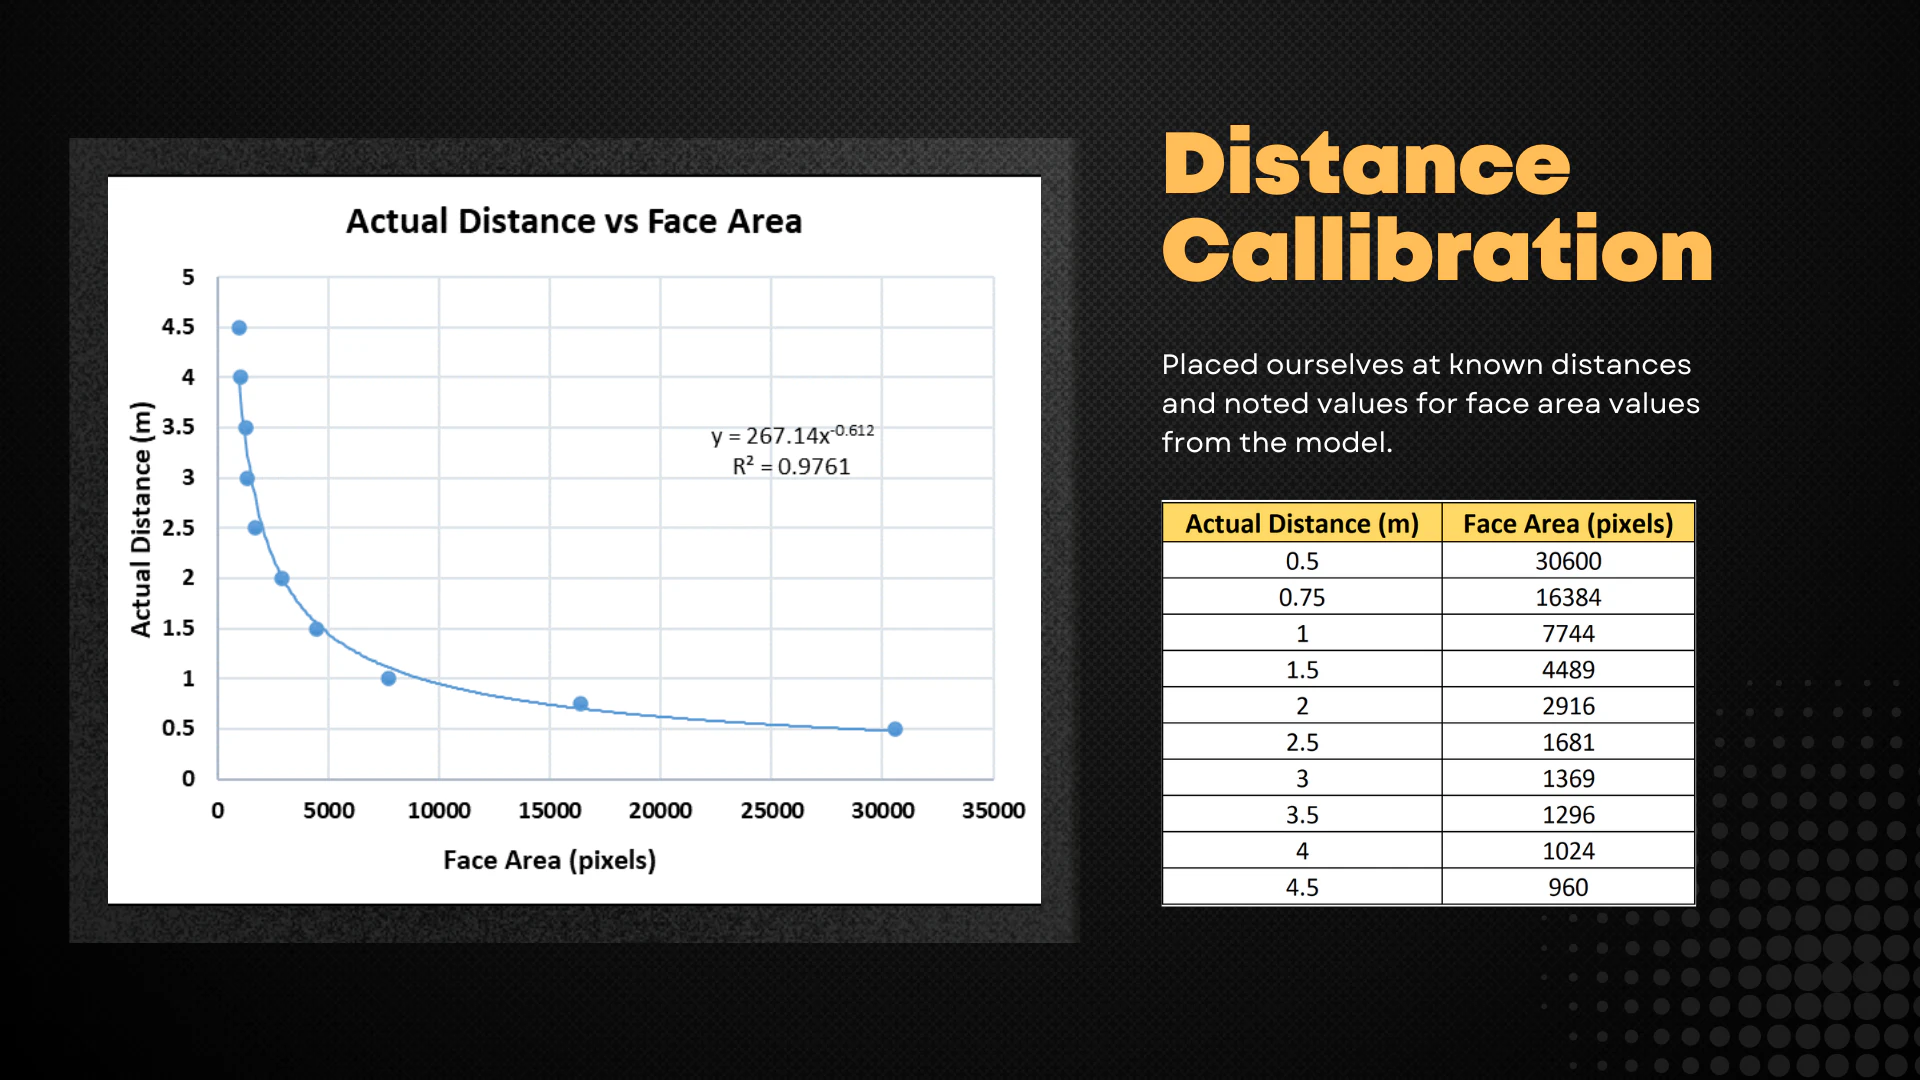
Calibration curve for distance measurement, showing the relationship between detected face size and distance.
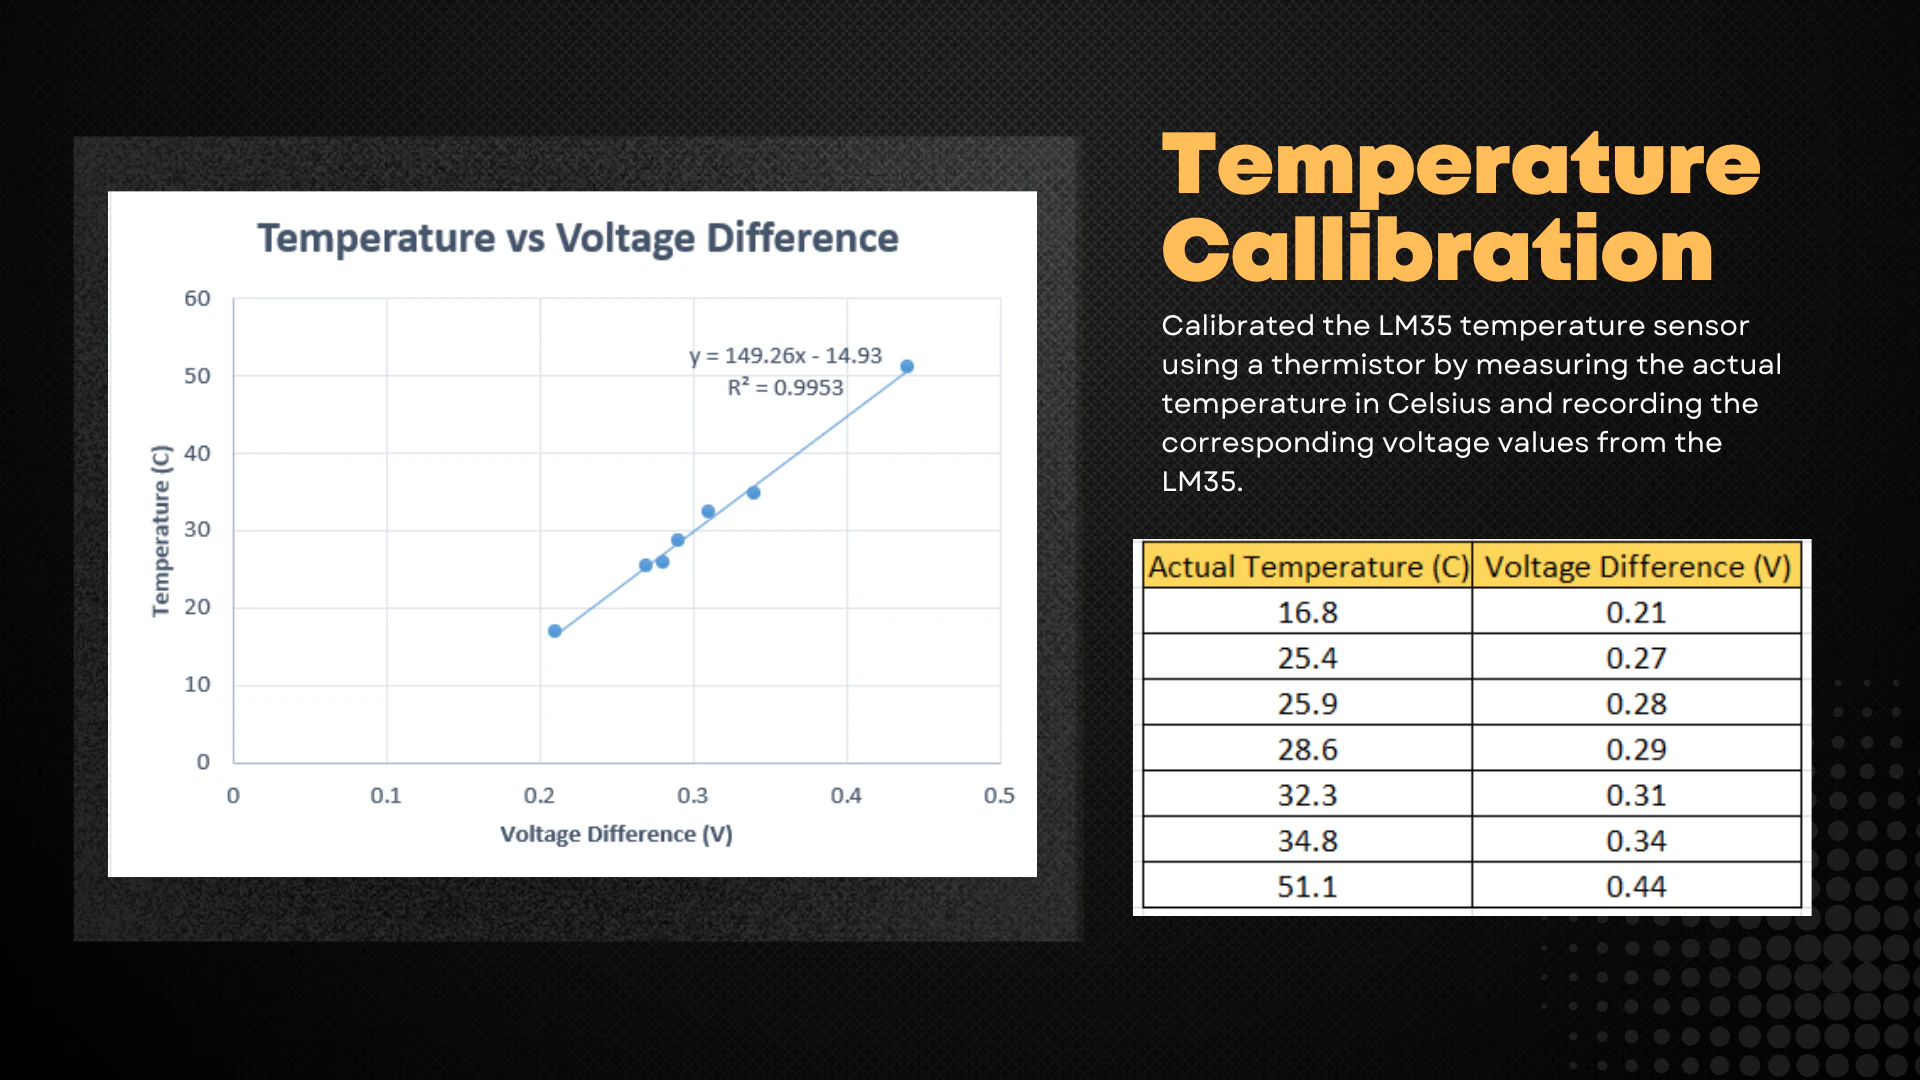
Temperature calibration curve used to adjust fan speed based on ambient temperature readings.
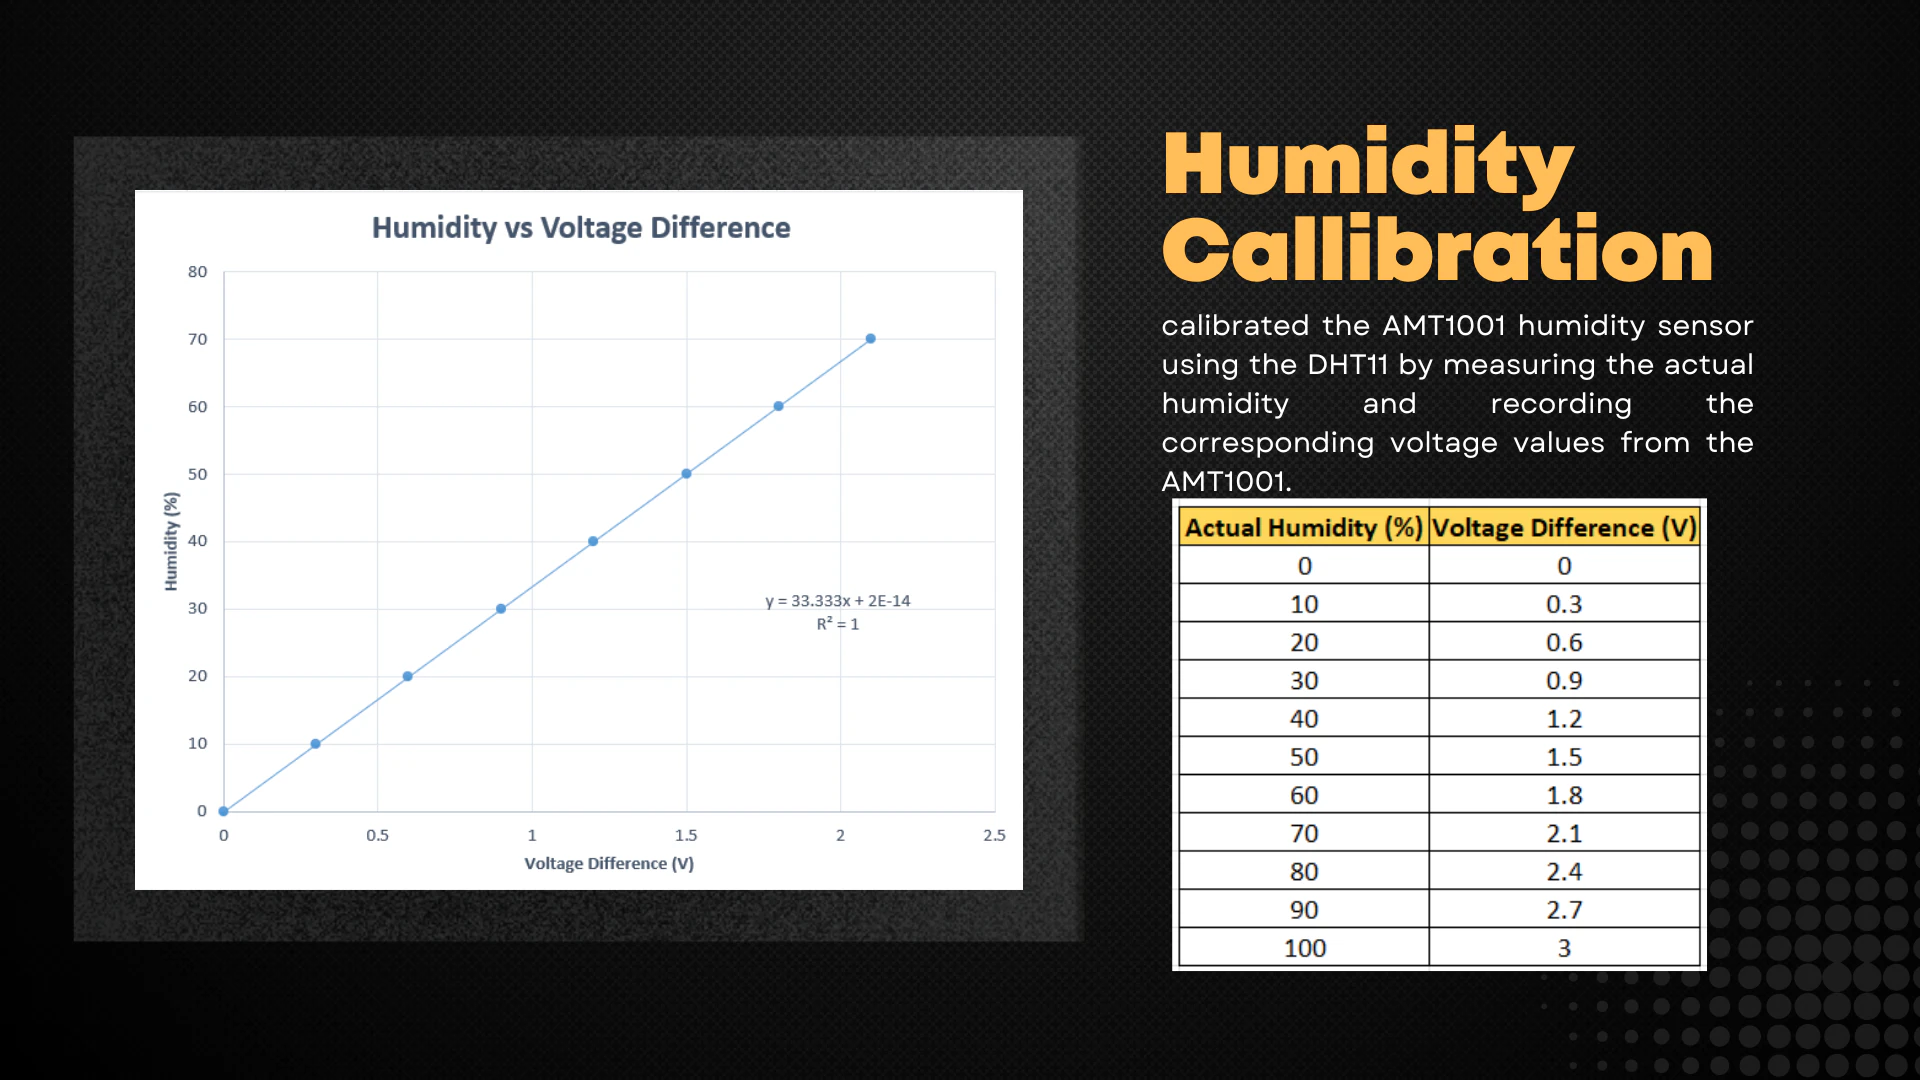
Humidity calibration curve for optimizing fan operation under varying humidity conditions.
How it works end to end
- Face Detection: Frames are processed to detect up to four faces - a deliberate cap that limits processing load while covering the realistic case.
- Distance Calculation: Each face's bounding box area is converted to a distance estimate via the calibration curve.
- Servo Angle Adjustment: Horizontal face positions set the servo angle, aiming airflow at the detected users.
- PWM Output: Fan speed adjusts to the farthest detected face, with LabVIEW closing the loop through the DC power supply.
Contributors
For more details, you can explore the GitHub repository.